DIY: porthole mirror
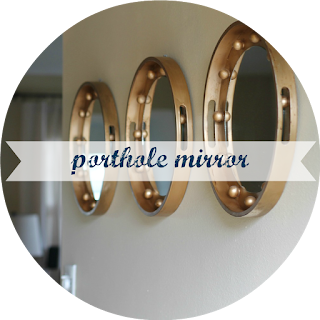
Before the start of the summer I began helping a friend fall back in love with her home (I'll share pictures once we're done completely). One area we worked on was her entry way. I suggested using three captain mirrors on one wall since the space would fit it nicely and it would help to bounce around some light making the entryway a bit brighter than what it was (the mirrors also give you a preview of her focal wall in the dining room as you walk in... bonus!). We searched for the perfect captain's mirror, 3 of them, with a decent price. After not finding anything she loved, I came across some trays on clearance at Target and had the idea of DIY'ing our own.
They turned into more of a porthole mirror after I had the thought of adding wooden "balls" around the mirror similar to my confederate mirror.
Here's what you'll need:
A round tray (don't worry about the color or design of it if you're not in love)
spray paint
strong adhesive ( I love E-6000 glue and use it for everything)
a mirror just a bit smaller in diameter of your tray (so it will fit inside)
wooden doll heads
dark wax and gloves (optional)
a ruler
an alligator hanger and hammer

First take your tray and doll heads outside and paint them with the color of spray paint you chose. You may need to do a few coats on them to make sure they are coated all the way. No need to do the center of the tray as the mirror will cover up that space, or the flat part of the doll heads.

Since these trays were not meant to hang on the wall, you'll need to put a hanger on it. My tray had a 16" diameter and handles on either side. If your tray doesn't have any handle holes then it won't matter where the middle is and you can put your hanger where ever. But if you have handles and you want it to hang evenly with the handles, use a large ruler to place on the horizontal diameter. Since mine was 16", I knew that 8" was the mid way mark. I used a second ruler to run from the center of the first ruler at 8" up to the top of the tray where I wanted to place the hanger. Make sure the second ruler measurements also come to the 8" mark where it hits the top of the tray so you know you have it straight. This may sound really confusing but there are arrows on the picture below so you know where to look on the rulers and once you are doing it yourself it will make much more sense. You're basically making your own T-scale to get accurate measurements.
Place the doll heads on with some of the E-6000. We eyeballed these so they looked evenly spaced out and used a total of 11 on ours. The wooden doll heads (purchased at Michaels) work great because they have a flat surface that makes it easy to glue to the tray without it rolling off like a perfectly wooden ball would.
We then decided the gold looked too shiny and new so we used some dark wax to distress it a bit. Make sure you don't rub too hard in one spot as it will start to take the paint off. Sometimes this can help make it look a bit more distressed but if you do it too much it will just look messed up.
Last glue your mirror down in the center with the E-6000. We used a 12" mirror from Michael's for our 16" tray. The 14" mirror would not have allowed enough space for the wood balls so make sure you plan accordingly depending on tray size.
The finished product...
The original plan I had thought of was to add a rope band around the mirror. In this case we would have used the 14" mirror, and then add more rope to the back and make it look like it was hanging from a long rope handle like a captain's mirror is designed. But the porthole/ confederate mixed design won out. And no I didn't steal hers, I made some for me too!
The total cost for each mirror was around $20. A lot cheaper than what you usually find them in the stores for. Score!


Comments