a family room design update and a ribbon border pillow tutorial.
It's been a while since I've been on so I thought I'd pop in and let you know how the living room design is going. If you remember this was the design board I came up with for the space.
I fell in love with these lamps around the holidays but knew I could wait and get the cheaper than the $50 price they were asking for them, which is still a steal compared the Pottery Barn's atrium lamps. Our Marshall's home decor items go on clearance pretty low and frequently since we are surrounded by tourists so after the holidays I found them at $39 but still decided to wait, none had been purchased so all 4 were still there. Finally about 3 months after I first spotted them I found them on clearance for $20 a piece! I ended up purchasing all 4 since my sister decided she wanted to be as cool as me and have a pair in her home as well! Patience pays off!
All of the pillows on the board I found off of Etsy but you know me, I love to try and recreate the things I find myself before I buy them so I decided I could easily re-create this pillow. Easy enough right?
you'll need:
choice of fabric
ribbon in your choice of color to coordinate with your fabric
stitch witchery product that is the same width as your ribbon or a little smaller
scissors
thread
a sewing machine
pins
an iron
I purchased some navy linen from JoAnn's on sale for around $15 for I think a yard and a half or maybe 2 yards I cant remember how much I got. I decided to make mine 22" to fit a 24" insert. For this size pillow cover I cut 2 matching squared at a little over 23" on all sides. {not sure whats up with the color on this picture}
I used a white gross grain ribbon that was about 1 inch think. Measure how long you want your ribbon border to be, remember to account for sewing hem.
You'll need 4 equal ribbons, mine were 18 inches long each.
Now you want to mark where you will sew them together to create a 90 degree angle.
Measure the same amount as your ribbon is thick. My ribbon was 1 inch thick so I measured 1 inch down on each end of the ribbon.
Now create a diagonal line connecting or corner to one of the marks you just made.
This will be the line you sew on to create your right angle.

You can barely see from the ribbon below but your diagonal ends will form an arrow if you place them together. In other words they will be mirror images of each other.

Now you need your sewing machine. Line up two of the ribbons evenly and carefully sew them together using the diagonal line on the ribbon.
If you sew them together correctly it should look like this.
Do this to all the corners to form a square. A word from experience, check twice to make sure your ribbons aren't twisted up when you start sewing more than 2 together. you don't want it to end up like this, still not sure how I let that one slip! If it happens just carefully use a stitch ripper to take out the thread and try again with the ribbon being straight.
It should look like this once you've sewed it the right way.
Now you want to trim the excess ribbon and flatten the seam.
Separate the seam and use an iron to flatten.
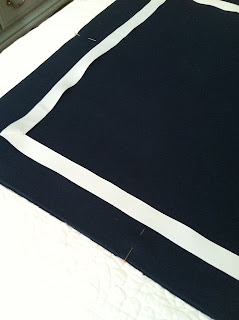
Now it's time to measure exactly where the ribbon will go on your pillow. you want it to be centered so start by measuring out where the middle is on each side of the fabric and mark with pins. Then line the middle of the ribbon up with the pin in the fabric. In my case it was at the 9 inch mark on the ribbon since my ribbons were all cut at 18 inches long.
Once you have 2 connecting ribbons placed in the right spot, go ahead and pin the perimeter of the ribbon corners so you know exactly where the ribbon lines up. I didn't put any pins in the ribbon due to the next step.
This is what it should look like once all 4 corners are done and your ribbon square should fit nicely right into the space you've mapped out.
Now it's time to adhere the ribbon to the fabric. I first used stitch witchery and this is why I did not place any pins in the ribbon so I could easily lift it up to put the stitch witchery down. After you've ironed on all the SW in place you can sew the ribbon on to give it a better and stronger adhesion to the fabric incase everything in your house has to be tonka tough because you have 3 little crazy boys who like to use pillows for everything but as a pretty piece to place on your sofa and look at. I simply used some white thread {you want it the same color as your ribbon} and sewed down each side of the ribbon on the same very faint seam line that my ribbon already had on it. Once the border is done them sew the back on to the pillow, I opted for a zipper closure, and you're done!
And here is the finished product and a sneak peek of the room. Still lots to do before it's finished but I'm not sure what else will be done until after we move... yep we're moving again, surprise surprise! you can see I also made some trellis patterned pillows like the design board had. I love Kelly Wearstler fabric but I wanted this makeover to be extremely budget friendly so I browsed Ebay and found some remnant samples just big enough for pillows. The best part about this is the sides were already finished so I didn't have to worry about any fraying. I paid about $25 to make both the trellis pillows! The Union Jack pillow belongs in my littlest's room but he had it out here for some reason and it look nice for the picture. The ottoman has to be replaced as well and the big impact rug has to be found, and art to go in the empty frames. Then it will be almost completely finished!
Follow along on instagram to see what else I find for the room {and others} and projects I'm able to accomplish, and to see the occasional craziness our family has to offer!
Meg


Comments