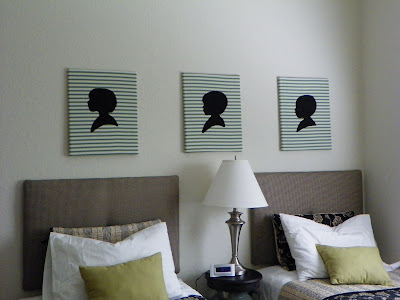
fabric silhouette art.
This past week me and the boys stayed at my parents since my oldest was attending golf camp at their golf course, and while I was there I worked on some art for their 2nd guest room aka the boys' room.
Here's how I did it:
{Materials needed:}
2 different {but coordinating} fabrics
a canvas of your desired size {we used 16x20}
scissors
iron on webbing
paper
pen
soft tip marker
scotch tape
spray on fabric adhesive
glue gun {optional}
iron

First take a side profile picture of who you are making a silhouette of and upload it onto the computer. Make it your desired size.

Tape the paper to the computer screen and gently trace the profile picture with the soft tip marker. {You could always print out the picture and cut the silhouette from that but this way saves on ink}. You can always edit with your marker any fly aways or what not, if you look closely you'll see my son was having a wacky hair day so I tamed the back of his hair a bit.

Iron on the fusible webbing to the fabric you have chosen for the silhouette.

Cut out the silhouette from the paper you just traced.

And trace the profile onto the fusible webbing that is now attached to the fabric. {make sure you trace it facing the opposite direction you want the finished piece to face. I wanted my profiles to face towards the left when hung on the wall so I traced them facing right}.

Cut them out.

Now peel off the back paper of the webbing and iron onto your main piece of fabric {this fabric must be big enough to wrap your canvas}.

This step you might want to go outside for. Spray your canvas with the adhesive spray and carefully place the fabric with attached silhouette onto the canvas {if you don't want to be stressed during this step pick a fabric that does not have stripes or any other pattern on it that will show if it is not perfectly straight on the canvas, my mistake here}.

Here is where you can use the hot glue gun to attach the fabric to the back or continue using spray. I used the hot glue first time around but decided to finish the 2nd two with the spray, it worked a lot faster but be careful not to over spray and get the entire back sticky. Attach your corner like this first.

Then fold the sides like this to create a simple and neat fold.

Trim the excess material.

To finish it off you can trim the border with upholstery nails, my mom has to order some from here before we can finish it 100%. But now you have a fun and personal piece of art work.

Close-ups.


Have fun making yours!
~Meg
{linking to the parties above}

Comments
Michelle
ourwonderfilledlife.com
I am going to make these. Thanks for sharing :)