Tis the Season Day 5: home-made Chrsitmas stockings.
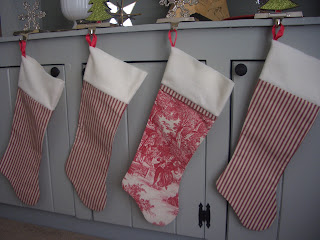
Since last year I made new Christmas stockings for us I thought I could carry on the tradition this year and make ones for 2010, especially since we have a new little one helping us celebrate Christmas {I need another stocking hanger, hence only 4 stockings are hanging at the moment}. I began with some scrap fabric I had and traced my oldest's first stocking for a pattern.

 I also cut some fleece for a cuff probably about 5 inches or so in height and a little longer length in width as the stocking.
 Like this. I put both right sides together and sewed the top of both sides {front side of stocking and back side of stocking}.
 So I ended up with this. Then I placed them right sides together and sewed just as I would a pillow, from the top of one end to the top of the other.
 For my stocking I used toile but wanted it to coordinate well with the boys' so I cut two skinny pieces of ticking the same width of my stocking to use as a trim between the main fabric and the cuff.
 I folded each piece in half and ironed it.
 So they both looked like this.
 I then sandwiched it between the stocking and the cuff and continued with the same steps as the other stockings from here on out.
 This is what it looks like once each side is sewed together. Also iron it at the time so it lays flat.
 To hang them I took some ribbon from my stash and cut them about 6-7 inches. Base it on however low or high you want yours to hang.
 Loop it and attach it to the inside of the "back- heel side" of the stocking's cuff.
 By sewing it, going over it a few times to make sure it's secure.
 You might want to use the same color thread as your cuff, I ran out of white and this was the next best color.
 In the end they look like this!


I love how they turned out this year. They are perfectly porportioned unlike last year when I free-handed my stockings template. It didn't take long at all and once again it was free since I had all of the materials already!
7 more days until the Cookie {recipe} Exchange linky party! And more Holiday projects coming, including more wreath talk!
~Megan
{linked to the parties in my sidebar}
 I began with some scrap fabric I had and traced my oldest's first stocking for a pattern.
 I also cut some fleece for a cuff probably about 5 inches or so in height and a little longer length in width as the stocking.
 Like this. I put both right sides together and sewed the top of both sides {front side of stocking and back side of stocking}.
 So I ended up with this. Then I placed them right sides together and sewed just as I would a pillow, from the top of one end to the top of the other.
 For my stocking I used toile but wanted it to coordinate well with the boys' so I cut two skinny pieces of ticking the same width of my stocking to use as a trim between the main fabric and the cuff.
 I folded each piece in half and ironed it.
 So they both looked like this.
 I then sandwiched it between the stocking and the cuff and continued with the same steps as the other stockings from here on out.
 This is what it looks like once each side is sewed together. Also iron it at the time so it lays flat.
 To hang them I took some ribbon from my stash and cut them about 6-7 inches. Base it on however low or high you want yours to hang.
 Loop it and attach it to the inside of the "back- heel side" of the stocking's cuff.
 By sewing it, going over it a few times to make sure it's secure.
 You might want to use the same color thread as your cuff, I ran out of white and this was the next best color.
 In the end they look like this!


I love how they turned out this year. They are perfectly porportioned unlike last year when I free-handed my stockings template. It didn't take long at all and once again it was free since I had all of the materials already!
7 more days until the Cookie {recipe} Exchange linky party! And more Holiday projects coming, including more wreath talk!
~Megan
{linked to the parties in my sidebar}


Comments
instructions!
They look like stockings from an
expensive shop! Great job!
Jane
Flora Doora